| Detail | Information |
|---|---|
| Prep Time | 20 minutes |
| Cook Time | 10 minutes (for stovetop pudding base) |
| Chill Time | 4 hours (minimum) |
| Total Time | 4 hours 30 minutes |
| Servings | 10–12 (9×13-inch dish) |
| Difficulty | Easy |
| Intensity | Low – gentle stirring, no heavy equipment needed |
Intensity notes: This recipe requires only basic stovetop heating (low to medium heat) for the pudding base. The rest is simple layering. It’s beginner-friendly and forgiving.
Ingredients
For the Homemade Vanilla Pudding:
-
2/3 cup (130g) granulated sugar
-
1/4 cup (30g) cornstarch
-
1/4 teaspoon fine sea salt
-
3 cups (720ml) whole milk
-
4 large egg yolks
-
2 tablespoons unsalted butter, cut into small pieces
-
1 tablespoon pure vanilla extract
For the Layers:
-
2 pounds (about 900g) fresh strawberries, hulled and sliced (plus a few whole for garnish)
-
4 medium ripe but firm bananas
-
2 tablespoons fresh lemon juice (to prevent banana browning)
-
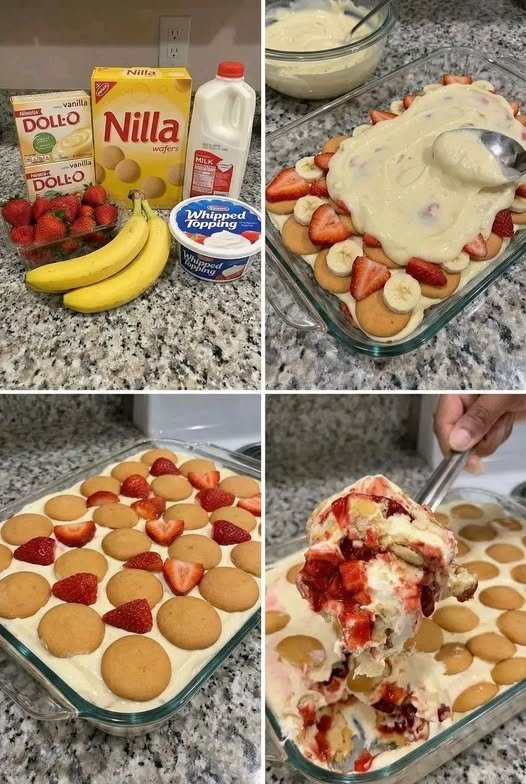
1 box (11 oz / 310g) vanilla wafers (e.g., Nilla) – about 60–70 cookies
For the Topping:
-
2 cups (480ml) heavy whipping cream
-
3 tablespoons powdered sugar
-
1/2 teaspoon vanilla extract
-
Optional: crushed vanilla wafers or fresh strawberry slices for garnish
Step-by-Step Instructions
1. Make the Vanilla Pudding (10 minutes + cooling)
In a medium saucepan, whisk together sugar, cornstarch, and salt. In a separate bowl, whisk the egg yolks. Gradually add the milk to the yolks while whisking constantly (this tempers the eggs so they don’t scramble). Pour the milk-yolk mixture into the saucepan with the dry ingredients.
Place over medium heat. Whisk constantly until the mixture thickens and comes to a low boil – about 5–7 minutes. Once it bubbles, reduce heat to low and cook for 1 more minute, still whisking. Remove from heat. Stir in butter and vanilla until smooth.
Pour the pudding through a fine-mesh strainer into a clean bowl (to catch any cooked egg bits). Press plastic wrap directly onto the surface to prevent a skin from forming. Refrigerate for at least 2 hours, or until completely cooled and firm.
2. Prepare the Fruit
Slice the strawberries into 1/4-inch thick rounds or half-moons. Slice the bananas into 1/4-inch coins. Immediately toss the banana slices with lemon juice to prevent browning.
3. Whip the Topping (if using fresh cream)
In a large chilled bowl, beat the heavy cream, powdered sugar, and vanilla with an electric mixer on medium-high intensity until stiff peaks form, about 3–4 minutes. Do not overbeat. Set aside.
Alternatively, use 4 cups of thawed frozen whipped topping (like Cool Whip) to save time.
4. Assemble the Pudding Layers
Choose a 9×13-inch glass or ceramic dish. Follow this order:
-
First layer: Spread 1/3 of the cooled vanilla pudding evenly over the bottom of the dish.
-
Second layer: Arrange vanilla wafers in a single layer (about 20–25 cookies), slightly overlapping if needed.
-
Third layer: Place half of the banana slices over the wafers, then half of the strawberry slices.
-
Fourth layer: Spread another 1/3 of the pudding over the fruit, covering everything.
-
Fifth layer: Repeat with remaining wafers, then remaining bananas and strawberries.
-
Sixth layer: Top with the final third of pudding. Spread to the edges.
5. Finish with Whipped Topping
Spread the whipped cream (or thawed whipped topping) evenly over the final pudding layer. Use a spatula to create gentle swirls. Garnish with crushed wafers, reserved strawberry slices, or banana slices (dipped in lemon juice first).
6. Chill – The Most Important Step
Cover the dish tightly with plastic wrap and refrigerate for at least 4 hours (overnight is better). This allows the wafers to soften into a cake-like texture and the flavors to meld.
7. Serve
Spoon into bowls or cut into squares. For clean slices, use a warm knife. Serve chilled.
The Last of the Recipe: Storage & Success Tips
Storage: Leftovers keep well in an airtight container in the refrigerator for up to 3 days. The bananas may darken slightly after 24 hours – the lemon juice helps, but it’s natural. If you want to avoid browning entirely, add bananas only on the day of serving (layer them on top of the pudding right before adding the whipped cream).
Make-ahead: You can prepare the vanilla pudding up to 2 days in advance. Assemble the whole dessert a day ahead – the wafers will become perfectly tender, almost like a trifle cake.
No leftover wafers? Crush any extras and sprinkle over the whipped cream for crunch.
Substitutions: For a lower-fat version, use 2% milk and reduce butter to 1 tablespoon. For dairy‑free, use coconut milk (full fat) and vegan butter – the pudding will still set beautifully. Replace whipped cream with coconut whipped cream.
Why make homemade pudding? Instant pudding mixes contain artificial flavors and preservatives. This stovetop version is richer, creamier, and lets the strawberry‑banana combo shine.
Nutrition Information (per serving, based on 12 servings)
| Nutrient | Amount |
|---|---|
| Calories | 485 kcal |
| Total Fat | 25g |
| Saturated Fat | 14g |
| Trans Fat | 0g |
| Cholesterol | 125mg |
| Sodium | 210mg |
| Total Carbohydrates | 60g |
| Dietary Fiber | 3g |
| Total Sugars | 38g |
| Includes Added Sugars | 24g |
| Protein | 7g |
| Vitamin D | 1mcg (6% DV) |
| Calcium | 140mg (11% DV) |
| Iron | 1mg (6% DV) |
| Potassium | 420mg (9% DV) |