Prep Time: 25 minutes
Proofing Time: 2 hours 30 minutes (total)
Cook Time: 35 minutes
Total Time: 3 hours 30 minutes
Intensity Level: MEDIUM (Requires patience for proofing and gentle kneading technique)
Why This Recipe Works
This isn’t your average white bread. Condensed milk acts as a natural tenderizer and sweetener, creating a crumb so soft it almost shreds like brioche—but without the heavy butter load. Each slice is pillowy, lightly sweet, and stays fresh for three days without drying out. Perfect for morning toast, French toast, or simply tearing apart with jam.
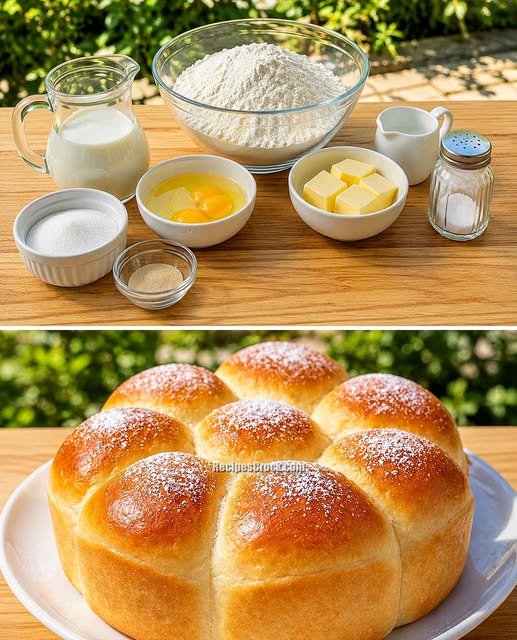
Ingredients
For the Dough:
-
3 ½ cups (450g) bread flour – High protein is key for structure
-
½ cup (120ml) warm whole milk (110°F/45°C)
-
⅓ cup (80ml) warm water (110°F/45°C)
-
7 tbsp (100g) sweetened condensed milk (room temperature)
-
1 large egg (room temperature)
-
¼ cup (50g) granulated sugar
-
2 ¼ tsp (7g) instant dry yeast (1 standard packet)
-
1 tsp salt
-
4 tbsp (56g) unsalted butter (softened, cut into small cubes)
For the Condensed Milk Glaze (Baked On):
-
2 tbsp (30g) sweetened condensed milk
-
1 tbsp (15g) unsalted butter (melted)
For Serving (Optional):
-
Extra melted butter and a sprinkle of flaky sea salt
Nutrition Information (Per Slice, 1/12 of loaf)
| Nutrient | Amount |
|---|---|
| Calories | 297 kcal |
| Protein | 7g |
| Carbohydrates | 45g |
| Sugars | 16g |
| Dietary Fiber | 1.5g |
| Fat | 9g |
| Saturated Fat | 5g |
| Cholesterol | 42mg |
| Sodium | 210mg |
| Potassium | 125mg |
Percent Daily Values based on a 2,000 calorie diet.
Special Equipment Needed
-
Stand mixer with dough hook (optional but helpful)
-
9×5 inch loaf pan
-
Kitchen scale (recommended for accuracy)
-
Instant-read thermometer
-
Pastry brush
-
Plastic wrap or proofing cover
Method – Step by Step
Intensity Level: MEDIUM
Why medium? The dough is sticky when wet, requires proper windowpane testing, and has two proofing stages. But no tricky shaping – it’s a straightforward loaf.
Step 1: Activate the Yeast (2 minutes)
In the bowl of a stand mixer (or a large mixing bowl), combine warm milk, warm water, and 1 teaspoon of the granulated sugar. Sprinkle the yeast over the top. Stir once, then let sit for 5–7 minutes. It should become foamy and smell bready. If not, your yeast is dead – start over.
Step 2: Make the Wet Dough Base (3 minutes)
Add the remaining sugar, the entire egg, and the 7 tablespoons of condensed milk to the yeast mixture. Whisk lightly until combined. The liquid will look slightly beige and smell sweet.
Step 3: Add Dry Ingredients (2 minutes)
Add the bread flour and salt to the wet mixture. If using a stand mixer, attach the dough hook and mix on low speed (speed 2) until a shaggy, sticky dough forms – about 1 minute. If mixing by hand, use a wooden spoon until it becomes too stiff to stir.
Step 4: Knead in the Butter (10 minutes – Medium Intensity)
With the mixer running on medium-low (speed 3–4), add the softened butter cubes one at a time, waiting until each is almost incorporated before adding the next. The dough will look like a disaster – greasy, slippery, and pulling apart. Do not add more flour. Keep kneading. After 7–8 minutes, the dough will suddenly come together, become smooth, and pull away from the sides of the bowl. It should feel soft, slightly tacky (like a Post-it note), and stretch without tearing.
Hand kneaders: Turn the dough onto a lightly oiled surface (not floured). Knead with a bench scraper, slapping and folding for 12–15 minutes until smooth.
Step 5: First Proof (Warm Intensity – 1 to 1.5 hours)
Lightly oil a large bowl. Form the dough into a taut ball and place it inside, turning to coat. Cover tightly with plastic wrap. Let rise in a warm, draft-free spot (75–80°F ideal). An oven with the light on works perfectly. Let rise until doubled in size – about 1 to 1.5 hours.
Test for readiness: Poke the dough gently with a floured finger. The indentation should remain and slowly spring back halfway.
Step 6: Shape the Loaf (Low Intensity – 10 minutes)
Punch down the dough to release gas. Turn it onto a lightly floured surface. Using a rolling pin, roll the dough into a rectangle approximately 9×12 inches. Starting from the short end, roll it tightly into a log (like a cinnamon roll, no filling). Pinch the seam closed. Place the log seam-side down into your greased 9×5 loaf pan. Tuck the ends under slightly for a uniform top.
Step 7: Second Proof (Warm Intensity – 45 to 60 minutes)
Cover the loaf pan loosely with greased plastic wrap. Return to your warm spot. Let rise until the dough crests about 1 inch above the rim of the pan. This takes roughly 45–60 minutes. Meanwhile, preheat your oven to 350°F (175°C).
Step 8: Apply the Condensed Milk Glaze (2 minutes – Low Intensity)
In a small bowl, mix 2 tablespoons condensed milk with 1 tablespoon melted butter. Using a pastry brush, gently paint the entire top of the risen loaf. Be generous – this creates a glossy, caramelized crust.
Step 9: Bake (35 minutes – Constant, Oven Intensity)
Place the pan on the middle rack of the preheated oven. Bake for 30 minutes, then rotate the pan 180 degrees. Bake for another 5–10 minutes. The bread is done when:
-
The top is deep golden brown.
-
An instant-read thermometer inserted into the center reads 190–200°F.
-
The loaf sounds hollow when tapped on the bottom.
Step 10: Cool Completely – The Hardest Part (1 hour – Patience Intensity)
Remove the bread from the pan immediately and transfer to a wire rack. Do not slice for at least 1 hour. Cutting warm bread collapses the delicate gluten structure, making it gummy. I know it’s hard. Wait.